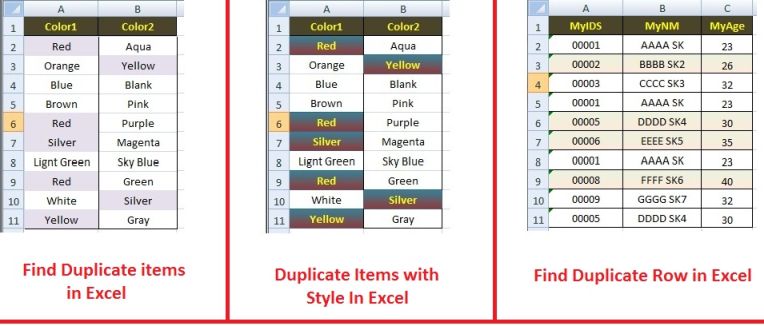
Find Duplicate Items in Excel Tips

Suppose, we have records containing duplicate values. And we want to find records that can repeat many times in records in Excel. So, In MS Excel tools provide following way to find Duplicate value in Excel or Find Duplicate in Excel.

Find Duplicate in Excel


  1. Find Duplicate through Simple Process in Excel
  2. Find Duplicate with Custom Color or Style in Excel
  3. Find Duplicate through Function in Excel
  4. Find Duplicate Row in Excel Using Formula

So, Lets start with every option in given above with following steps:


(1). Find Duplicate through Simple Process in Excel :

For Simple Process, you have to follow the steps:

1.
 Select All Rows And Columns in Which you want to find duplicate items.

2.
 Find “Conditional Formatting” option from “Home” Tab.

3.
 Click on “Conditional Formatting”, it will show popup List Containing many options.

4.
 Go to “Highlight Cells Rules”. It also shows a list of Option. Click on “Duplicate Values..” option.

5.
 This will show “Duplicate Vales” window. Contains options and Color indicator for duplicate value.

6.
 After Selecting desire color. Click on “OK” button. This will highlight duplicate values or items with chosen color.


Find Duplicate in Excel with Simple Process


As you can see, there will be colored cells of duplicate items in MS Excel.


(2). Find Duplicate with Custom Color or Style in Excel :

If you want to change Duplicate Item’s cell’s color, border or font then, you have to follow steps:


1.
 First Select All Rows and Columns in which you want to indicate duplicate values or items.

2.
 In “Conditional Formatting” click on “New Rule…” from it.

3.
 This will display “New Formatting Rule” dialog.

4.
 Select “Format only unique or duplicate values”. After this option selection, press “Format…” button. This will show “Format Cells” dialog.

5.
 If you want to Change Font Name, Size or Font Color then go to “Font” Tab. If you want to change border Style then go to “Border” Tab. If you want To change cell’s background color then go to “Fill” Tab.

6.
 After that press “OK” button from “Format Cells” dialog. Then press “OK” button from the dialog of “New Formatting Rule”.

This steps show Duplicate Items in different style like bellow:

Duplicate with Custom Color and Style in Excel


This way you can Highlight Duplicate in Excel.


(3). Find Duplicate through Function in Excel :

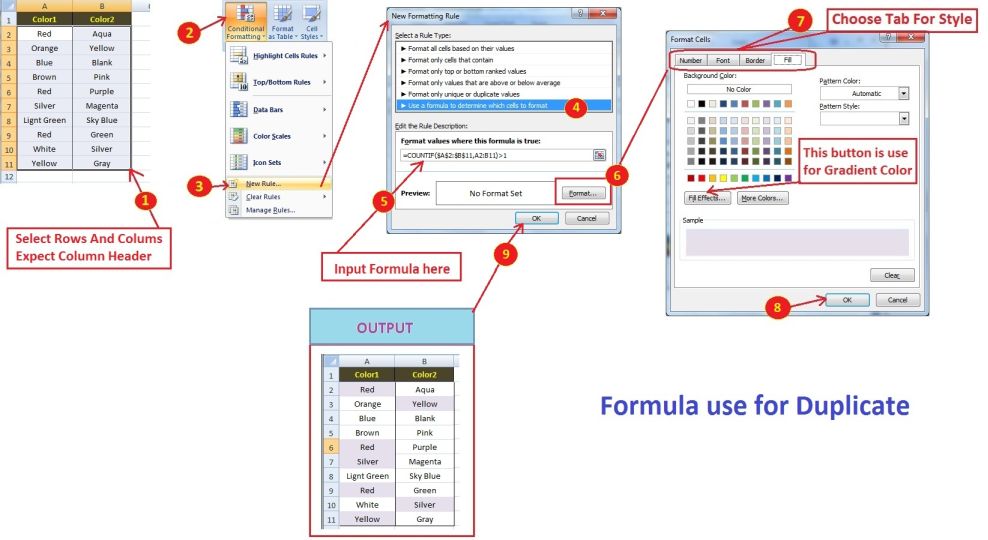
Now if you want to find duplicate items through custom rules applying with formula. Then we have to use “COUNTIF” function like following steps:

1.
 Same as above Go to “Conditional Formatting” then click on “New Rule…”.

2.
 This will show “New Formatting Rule” dialog. Here we select “Use a formula to determine which cells to format”. After selecting this, “Format values where this formula is true:” Formula Box will appear.

3.
 The duplicate formula function Syntax is :

=COUNTIF (range, criteria)>1

 Details:

=COUNTIF(Selection Of Rows and Columns, Selection For Which cell will be count) > 1


Example:

=COUNTIF($A$2:$B$11, A2:B11) >1


4.
 Then click on “Format…” button for color and style of duplicate items. Then click “OK” button.


This process will also show duplicate items with style and color.

Find Duplicate through function in Excel


(4). Find Duplicate Row in Excel Using Formula :

Suppose, you want to check duplicate Row in Excel not duplicate cell. Then you have to use same process as describe above but using different formula “COUNTIFS” with following steps:

1.
 Same as above Go to “Conditional Formatting” then Click on “New Rule…”.

2.
 This will show “New Formatting Rule” dialog. Now go to the option “Use a formula to determine which cells to format”. After Selecting this, “Format values where this formula is true:” Formula Box will appear.

3.
 Write formula as describe below:

 
=COUNTIFS($A$2:$A$11, $A1, $C$2:$C$11, $C1)>1


This will show Duplicate Row in Excel.

Find Duplicate Row in Excel


So, In this way we can find the duplicate items in Excel and Duplicate rows in Excel and find Duplicate in Excel with easy tech tips.

Excel Filter Types And Use Filter in Excel Tips

In MS Office, you will find that there is many features which provide easy data handling for any company or concern. So here we will discuss and learn about Types of Filter in Excel and Use Excel Filter with easy tech tips. In MS Office, Excel provide many advanced features.


Text_And_Number_Filters_In_Excel

Shortcut Key :  ( Ctrl + Shift + L) or ( Ctrl + Shift + l) for Add Filter in Excel Column or Remove Filter in Excel Column.

Find Filter Option In Excel :

First When you open excel sheet, you will find that your excel file open with “Home” tab. This tab contain some option.

 1.  Find ‘Editing’ option from this tab. 

 2.  ‘Editing’ option contain many options (‘AutoSum’, ‘Fill’, ‘Clear’, ‘Sort & Filter’, ‘Find & Select’). 

 3.  Here, you will click on ‘Sort & Filter’ Option. This will Show Options List. Select ‘Filter’ option.

Filter Option Excel

Or

 1.  Find “Data” Tab from menu. This Tab contain many option.

 2.  Go to “Sort & Filter” Option. And Select “Filter” option.

Filter Option Excel Step 2


 3.  This will add filter button Filter Button in Excel on every Column Header as describe above image. 

 4.  When you click on this button, it will show popup window containing filter option. Like above image. And when you apply filter then the Filter Button Apply Filter Button in Excel icon will change.


Here are following excel filter types:

  1. Manual Filters
  2. Text Filters
  3. Numbers Filters
  4. Filter by Color in Excel


Now Lets Start with Point to Point and step by step to understand amazing feature of filters.

(1). Manual Filters :

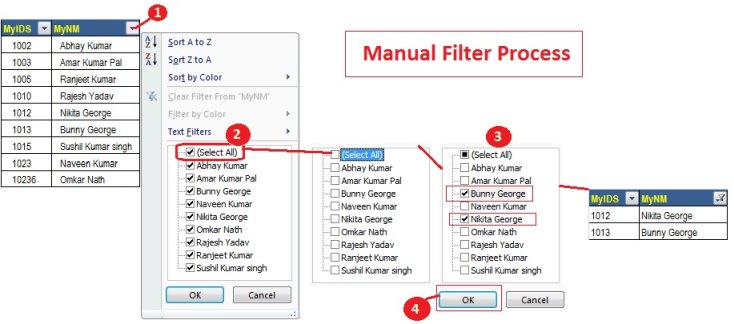
If you want to set filter manually, then there is a list will popup when you click on Filter button containing particular column record. 

First remove check from “Select All”. 

Or Clear tick mark from all Check Boxes. Then check that items which you want to show like bellow.

Manual Filter in Excel


As you can see, the output will appear in desire filter selection base.


(2). Text Filters :

In this filter, if table column's rows contain string or alphanumeric value then this filter automatic show "Text Filters" option after clicking on filter button on particular column.

This Filter have many options. The details and steps are as follows:


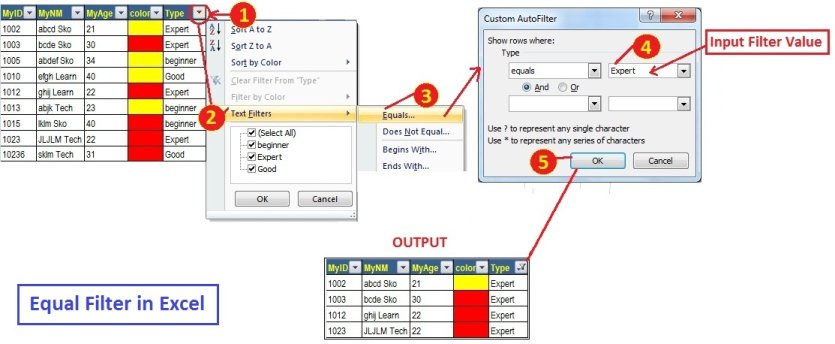
Equal Filter in Excel :

1. In this filter select "Equal" option. 

2. Input your filter value or string in "Custom AutoFilter" window's Textbox.

3. Then click on "OK" button.

Equal Filter in Excel

And the output will look like above.


Begins With Filter in Excel :

If you want to show data that contain starting character then this filter is helpful.

1. Click on "Begins With..." option from "Text Filters".

2. Then once again Input some part or the beginning of string in TextBox which is in the side of Type Combobox with "begins with" option.

Begins With Filter in Excel


Ends With Filter in Excel :

If you want to show records according to containing last character. Then this filter will help.

1. Click on "Ends With..." option from "Text Filters".

2. Then once again Input some character that end with that string which you want to filter in TextBox which is in the side of Type Combobox with "Ends with" option.


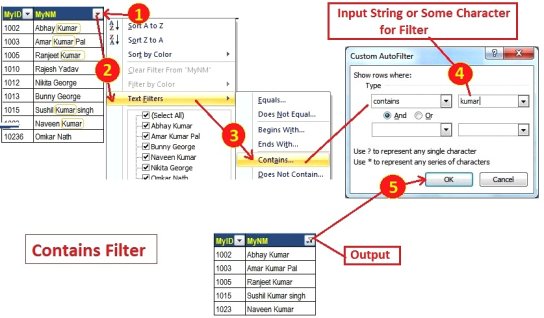
Contains Filter in Excel :

This is the most used filter in business area. If you want to search records or list of all record that have match any character of that particular cell's then this will help.

1. Click on "Contains.." option from "Text Filters".

2. Then once again Input some character that will be exist in string which you want to filter in TextBox which is in the side of Type Combobox with "contains" option.

Contains Filter in Excel


(3). Numbers Filters :

In this filter we will learn some filters which is mostly used. This filter will apply on That Column which have a list of Number or Numeric values.


Greater Than Filter in Excel :

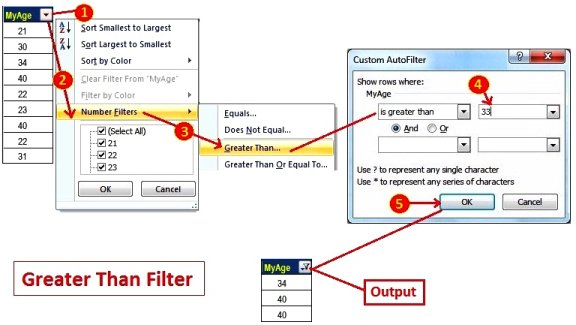
Suppose, there is a list of Numbers, in which you want to find Greater Numbers list with given filter number. Then this filter will help.

1. Click on "Greater Than..." option from "Number Filters...".

2. Then input number in "Custom AutoFilter" dialog, which will filter greater number.

Greater Than Filter in Excel


Less Than Filter in Excel :

Suppose, there is a list of Numbers, in which you want to find Less Numbers list with given filter number. Then this filter will help.

1. Click on "Less Than..." option from "Number Filters...".

2. Then input number in "Custom AutoFilter" dialog, which will filter Less number.

Less than filter in Excel


Between Filter in Excel :

Between filter will apply when you input Greater Than value and Less Than Value in filter like below. This will show the Between Filter Output describe in image.

1. Click on "Between..." option from "Number Filters...".

2. Then input number in "Custom AutoFilter" dialog, which will between the greater than or equal And less than or equal number of given input value.

Between Filter in Excel


(4). Filter by Color in Excel:

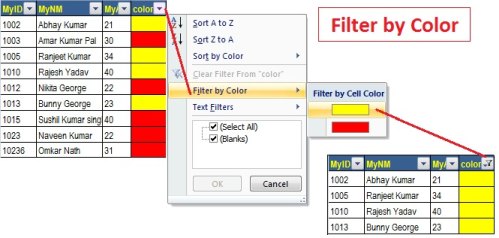
Here we can filter records by particular color selection. Following Image will describe how it will work?

Note: This filter will work only when cells contain background color on particular column's rows.

1. For this filter you have to click on "Filter by Color" option.

2. Choose whatever color's record want to show like below.

Filter by Color in Excel

Show Records from particular Column's rows color in Excel.


So, these are the Types Of Filter in Excel and How to Use Excel Filter with step by step process.

How to Make Image Selected Area Transparent in Gimp

In this post SKOTechLearn will describe How to Make Image Selected Area Transparent in GIMP or Image Selected Area Transparent in GIMP. As you know GIMP provide image processing of all kind of image formats. You can modify, beautify and change format of image through this application.

Selected Area Transparent in Gimp

Here, we will describe three way to make area transparent in GIMP. You just follow the steps described bellow with following points:


  1. Use ‘Rectangle Select Tool’ To Make Selected Area Transparent
  2. Use ‘Free Select Tool’To Make Selected Area Transparent
  3. Use ‘Eraser Tool’To Make Selected Area Transparent

So, First Open your Image in Gimp. Then proceed with following way:

(1). Use ‘Rectangle Select Tool’ To Make Selected Area Transparent :

If you want to use ‘Rectangle Select Tool’, you have to follow the steps in GIMP.

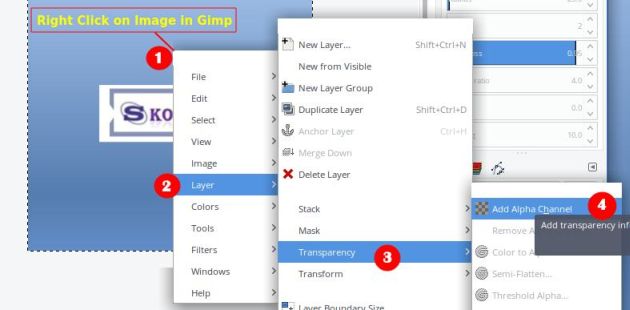
 1.
 Right click on Image in Gimp.

 2.
 A drop down menu will appear, Go to ‘Layer’ option.

 3.
 In ‘Layer’, go to ‘Transparency’ option.

 4.
 Then Select ‘Add Alpha Channel’.

Let's see the instruction given in following figure.

 
Add Alpha Chanel In Gimp


 5.
 After that select ‘Rectangle Select Tool’ from ‘Tools’.

 6.
 Now, select area where you want to make selection transparent.

 7.
 And Press ‘Delete’ from Keyboard.

Select Tool For Selection Transparent in Gimp


Now, let's proceed to second process.


(2). Use ‘Free Select Tool’ To Make Selected Area Transparent :

Like above given Points for ‘Add Alpha Channel’. You have to do same in this process. 

 (Right Click) Image >> “Layer” >> “Transparency” >> “Add Alpha Channel” 

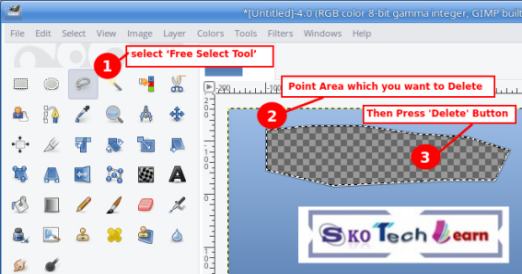
 1.
 After this Process, you have to go to ‘Tools’ window and select ‘Free Select Tool’.

 2.
 Then point on area which you want to make transparent.

 3.
 And then join start and end point of ‘Free Select Tool’ then Press ‘Delete’ Button from Keyboard.


This will make desire area transparent.


(3). Use ‘Eraser Tool’ To Make Selected Area Transparent :

Same way you have to select ‘Add Alpha Channel’ like first process.

(Right Click) Image >> “Layer” >> “Transparency” >> “Add Alpha Channel” 

 1.
 After that Select ‘Eraser Tool’.

 2.
 Then go to ‘Eraser ToolProperties and Increase or decrease EraserSize’ according to area selection.

 3.
 Then click on area of Image.

This will make eraser area transparent.
Eraser Tool For Selection Transparent in Gimp


Note: If you want to increase or decrease transparency level, you have to simply go to ‘Eraser’ tool’s Properties window and Increase or decrease ‘Opacity’ from 0 to 100%.

This is the simplest and easy way to manually select area and make it transparent. 

In Gimp, you will find many other tools that provide facility to transparent selected part in GIMP. So, this way you can make Image Selected Area transparent in GIMP with SKOTechLearn easy tips.

Steps to Change Dark Theme to Light Theme in Visual Studio Code

If you like Light Theme in Code Editor in Visual Studio Code then here SKOTechLearn will describe the steps to Change Dark Theme to Light Them in Visual Studio Code. And Here we will also describe the steps to Customize Color or Theme in Visual Studio Code.

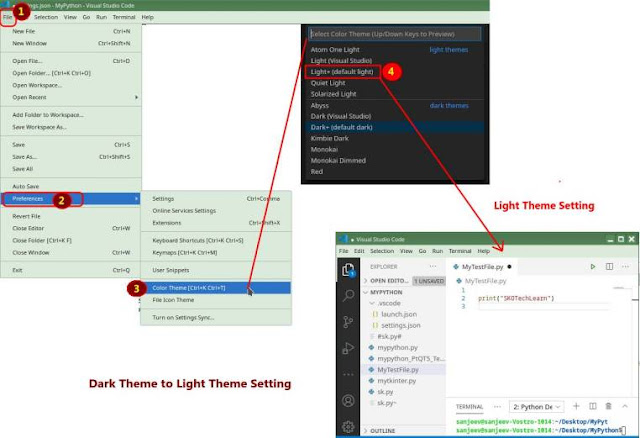
Dark theme to Light Theme in Visual Studio Code

By default VS Code contain Dark theme. You know that Visual Studio is highly customized code editor compare to all other code editor. And you can find many feature to change Look and Feel in Visual Studio Code.

Change visual studio code background color

Now, we can choose any one process for Change Code Editor Color in Visual Studio Code:

  1. Change Theme of Visual Studio Code through Shortcut Key
  2. Change Theme of Visual Studio Code through Settings
  3. Change Color Theme of Visual Studio Code through Code


(1). Change Theme of Visual Studio Code through Shortcut Key:

When you open VSCode, and want to change theme, then simply you have to press two different shortcut Key one by one same time.

Press First Shortcut Key:  CTRL + K 
After that Press second Shortcut Key:  CTRL + T 

Now, you will see a drop down Option Box “Select Color Theme (Up/Down Keys To Preview)” will appear containing list of existing theme like bellow:

Change Theme in Visual Studio Code through Shortcut Key

This Option Box contain two types of Theme Category first is “light themes” and second is “dark themes”. If you want to change VSCode in light theme, then choose first category.


(2). Change Color Theme of Visual Studio Code through Settings:

If you want to proceed for color change through VSCode settings, then you have to follow the steps:

1.
First Go to “File” menu.

2.
Find “Preferences” and select it.

3.
And then select “Color Theme[Ctrl+K Ctrl+T]” option from it.

4.
Now, a drop down list will appear containing themes options. Choose anyone which you like.

Settings to change Theme color in Visual Studio

As you can see, in this way you can change Dark Theme to Light Theme in VSCode.

(3). Change Color Theme of Visual Studio Code through Code:

This is very interesting process to Change Look and Feel Of Visual Studio Code. In this Process you can change every Part of VSCode Tool's color according to your desire. You have to Simply proceed with following way:

1.
Same as above given steps, you have to first go to “File” menu then “Preferences” then “Settings”.

2.
You will find “Settings” Tab will appear. Go to Search Bar and search for “.json”.

3.
You will get “Edit in Settings.json” option. Just click on it.

4.
Now “Settings.json” file will display. Add color code like bellow:

{
     "workbench.colorCustomizations": {
     //For Code editor Color Change
     "editor.background": "#edeafa",
     "editor.foreground": "#4b4548",

     //For Sidebar Color Change
     "sideBar.background": "#fddcaa",
     "sideBar.foreground": "#612144", 

     //Change Activity Bar Color
     "activityBar.background": "#7f61a7",
     "activityBar.foreground": "#c5ff3e",
     "activityBar.inactiveForeground": "#6dc58f"
     }
} 

After writing this code, save it and see what happen:
Customise Theme Color in Visual Studio Code

As you can see you can manually create theme in VSCode.

So, this way you can easily Customize Theme Color of Visual Studio Code. And also set Light theme in VSCode.

Best Free and Easy Way of JPG to TIFF Convert or Multi Tiff Convert

This article is related to convert image in other formats like, JPG, PNG, TIFF, PDF etc. But here SKOTechLearn will explain the Best and Easy Way of JPG to Tiff Convert or JPG to Multitiff Convert in Windows.

If we start to look at the point that the main formats is used in personal or official use is mainly JPG or PNG, Tiff and PDF. So, here we will target the image conversion process that will describe below.

In this Process SKOTechLearn will tell you that single format conversion to multi format or Batch conversion of multiple files through given following tools. That is free to use.

  1. JPG to Tiff Convert through IrfanView with Batch Process.
  2. JPG to Multitiff Convert through IrfanView
  3. JPG to TIF or Multi Tiff Batch Conversion through ImageMagick
  4. JPG to Tiff Convert through Gimp

So, we will proceed with step by step process.

(1). JPG to Tiff Convert through IrfanView with Batch Process

IrfanView is very light weight and easy tools to format any types of images. If you want to convert more than one JPG file to tiff format at once, then this tool provide the Batch process to convert more than one file at a time.

First we try with 6 files only.

(1)  Step1:
 Open IrfanView, Go To “File” Menu.

(1)  Step2:
 When you click on “File” Menu. Drop down List will appear. Find “Batch Conversion/Rename…” option and click on it. Or you can Press “B” button as shortcut Key.

(1)  Step3:
 You will find a “Batch Conversion” window will appear. Go to “Batch Conversion Settings:” and choose your file type from “Output format:” combo box.

(1)  Step4:
 Choose “TIF – Tagged Image File Format” option from it.

i_View Batch Conversion Steps for JPG to Tiff
i_View Batch Conversion Steps

(1)  Step5:
 After that, there is also an option to provide the compression type for TIF file Format. So, go to “Options” button which is related to “Output format:” combo box.

Tools for Open Edit CDR file and CDR file conversion

(1)  Step6:
 When you click on “Options” button. A “TIFF save options” dialog box will show. Choose compression type according to requirement.
Tiff Compression Option for JPG to Tiff Convert
Tiff Compression Option

(1)  Step7:
 If you want to Change DPI of an Image or resize your image or change color to the Image then this tool provide the option as “Use advanced options (for bulk resize..)” as check box. If you tick on it the “Advanced” button will be enabled. Just click on it.
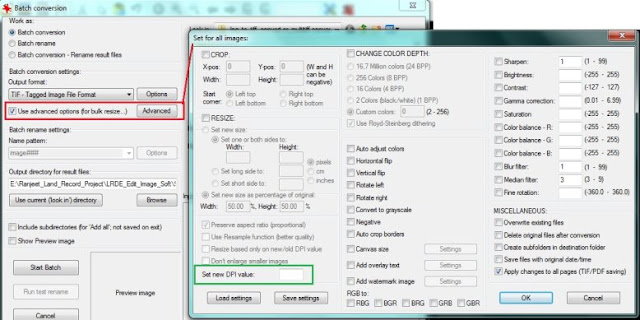
DPI and Image Setting for JPG to TIFF
DPI and Image Setting

(1)  Step8:
 After that, Input or select the Location of your Files. Just go to right side of “Batch Conversion” window and find “Look in:” file browser box.

(1)  Step9:
 After Selecting path, Press “Ctrl+A” to select all files. And press on “Add all” Button.  The selected files will be listed in “Input files” list box.

(1)  Step10:
 Finally, you have to browse or input your output directory. You can input Files’ path in “Output directory for result files:” input box or you can browse  path by clicking on “Browse..” button.

(1)  Step11:
 And Last press on “Start Batch” button.
Irfan View Batch Conversion File Selection
Batch Conversion Source and Destination File Selection
 Note: Batch process takes more or less time depending on number of file.

So this is the way where you can easily convert JPG to Tiff through batch process.

JPG to Tiff Convert Process

(2). JPG to Multitiff Convert through IrfanViwe

Now, if you want to proceed in multiple JPG file into Multi-Tiff, then there is no Batch Process available in IrfanView, you have to proceed with one by one in following steps:

(2)  Step1:
 Go to “Options” menu.

(2)  Step2:
 Find “Multipage images” option and click on “Create multipage TIF..” option on it.

(2)  Step3:
 “Create multipage TIF file” dialog box will appear. Click on “Add images” button to browse files for conversion.

(2)  Step4:
  After that choose output location through input in “Save directory:” text box.

(2)  Step5:
  Input your output filename inside “Result filename:” text box.

(2)  Step6:
  And last press on “Create TIF image” button.
i_View JPG To Multi Tiff Conversion Process
The above image describes, how to change multiple JPGtoMulti-Tif through irfanView. Now this process will create Multi-Tif Files.

(3). JPG to TIF or Multi Tiff Batch Conversion through ImageMagick

ImageMagick is really a magical tool for image process related to PDF, JPG, TIF etc. There is lots of batch script , you can use your desired image format. And the amazing point is that ImageMagick is free for All Operating system like: Windows, Linux, Unix.

Simple Batch Renaming Process of Multiple file using Excel

Now, here we will start JPG to Tiff or Multi Tiff batch conversion in windows through ImageMagick with following steps:

(3)  Step1:
 First Go to ImageMagick Installation Location where “magick.exe” exist. Copy this path and paste it on Notepad. Eg. "C:\Program Files\ImageMagick\magick.exe"

(3)  Step2:
 After that type open “cmd.exe” and load you JPG File location like:
Load Directory in cmd for conversion
Load Directory in cmd
(3)  Step3:
  Now, it’s time to run conversion script. Type Following script for conversion:

"C:\Program Files\ImageMagick\magick.exe"  -compress none *.jpg MyMultiTif.tiff
ImageMagick Batch Conversion Command Steps
ImageMagick Batch Conversion Command

(3)  Step4:
 After typing above script on cmd, press “Enter” Key. You will find “MyMultiTif.tiff” file will be generated on current location.

This is the magic of ImageMagick tool.

(4). JPG to Tiff Convert through Gimp

Gimp is an Open Source and Free alternative of Adobe Photoshop. Like Photoshop, you can easily modify image in Gimp.

Create folders or sub-folders and copy file through Batch Process

Now we will learn, How to Convert JPG to TIF using Gimp. Follow the following steps:

(4)  Step1:
 Open GIMP. Then go to “File” menu and click on “Open..” option.

(4)  Step2:
 “Open Image” dialog box will appear. Browse your JPG File.

(4)  Step3:
 Your file will display on Gimp dashboard. Right click on Image and go to “File” option from drop down menu.

(4)  Step4:
 Click on “Export As…” option from “File” option.

(4)  Step5:
 “Export Image” dialog box will appear, Fist select file’s extension from “Select File Type (By Extension)” list box.

(4)  Step6:
 After that select output location and Click on “Export” button.
Gimp Image Conversion Process
Now your File will be exported in TIF format using GIMP.

Google Chrome Loading Problem Solution

So, Above given four process, you can easily convert JPG to TIF Convert or MultiTIF Convert with SKOTechLearn Tips.

Open Edit Cdr File and Convert Cdr to other format

If you have problem of opening cdr (coreldraw) files. If you want to open CDR File without using CorelDraw. If you want to Edit CDR File or If you want to Convert CDR File to PDF or any other format like JPEG, PNG etc. then you must read this post for further information about Open Edit CDR File and Convert CDR to Other Format.

So, don’t worry about it, in this post SKOTechLearn will tell you the easy and simple way of opening CDR File with free open source tool that can be use for editing or converting in PDF, JPG or PNG etc.

JPG to TIF or Multi-TIFF Conversion Process with Free Tools

So, Let’s learn how to according to following process.

 How to Open CDR file? 

First of all, you have to know that cdr is a vector image format, which cannot open easily on any other image viewer tools like “Microsoft Office Picture Manager” or “Windows Photo Viewer”. You have to use a particular tool that will support Vector image like “CorelDraw” or “Inkscape”.

You can use “Inkscape” for it. It is lightweight and free with open source tool.

First, you have to download and install  Inkscape. There are options of OS compatible for Windows, Linux with (32bit, 64bit) architecture. Just go to site and follow the downloading steps described in following image.
Download_Inkscape_instruction_For_Windows
"Inkscape" Download Instruction
I recommend for “Windows Installer Package (.msi)” option for download. Now after downloading and Installing “Inkscape”, if you want to open your file in this application or set “Inkscape” as default application for opening it. For this default process procedure follow the image bellow.
Set as default application process in windows
Set as default application process
For Open File in Inkscape.

➤ First right click on your file.

➤ Then select “Open” option. This will show “Windows” screen.

➤ In this screen, we will select “Select a program from a list of installed program” option. And press “OK” button.

➤ It has again presented another screen of “Open with”. If this screen not show “Inkscape” application, press on “Browse” button.

➤ Now in “Open with…” screen go to “C:\Program Files\Inkscape” and select “Inkscape.exe”.


After this process. Your default icon will looks like above given image.

Batch Rename Multiple File Using CMD with Excel Data

And the file will show in this application like bellow.
Open_cdr_in_Inkscape
Open Inkscape


 How to Edit cdr file?

For editing it, you can easily select , move, resize, delete and insert object of this vector image.
Everything available for editing in this tool.
Edit_Vector_Image_in_Inkscape
Edit Vector Image process
Note: You can easily open it in “Inkscape” and easily edit or modify it, but you cannot save it in cdr extension. You can save it as “*.svg” extension or other format.


 How to Convert CDR to JPG or other format?

If you want to convert it in JPG, First remember one thing, you have to fist convert it in PNG format because there is no option in direct JPG conversion. Now, you have to proceed in following way:

Convert through “Save As..”:
➤ Go to “File” menu and Find “Save As…”.
➤ If you select “Save As…”option, “Select File to save to” screen will appear.
➤ Find “Save as type:” combo and it will show different types of file format.
➤ Find “Cairo PNG (*.png)” and save it in desire location.

Convert through “Export PNG Image…”:
➤ Go to “File” menu and Find “Export PNG Image…
➤ It will present right side pane. Just Input path and File name in “Filename” Textbox.
➤ And then press “Export” button.
cdr_to_Image_convert_Process
CDR to PNG convert Process
Now it will be converted in PNG format.

After that open PNG file in MS Paint and save it as JPG format.

Multiple Folder Creation throuch CMD and Copy related File in particular Folders through CMD

Through "Inkscape" you can easily convert it in different format, there is the following conversion exist in this tools:

Cdr to PDF Convert 

Cdr to  PS (Post Script) Convert

Cdr to dxf (AutoCAD DXF R14) Convert


So, these are the way where  you can easily open CDR File and Edit CDR file and Convert CDR to JPG or Other format.