In this post SKOTechLearn will describe How to Make Image Selected Area Transparent in GIMP or Image Selected Area Transparent in GIMP. As you know GIMP provide image processing of all kind of image formats. You can modify, beautify and change format of image through this application.

Here, we will describe three way to make area transparent in GIMP. You just follow the steps described bellow with following points:
- Use ‘Rectangle Select Tool’
 To Make Selected Area Transparent
 - Use ‘Free Select Tool’
 To Make Selected Area Transparent
 - Use ‘Eraser Tool’
 To Make Selected Area Transparent


So, First Open your Image in Gimp. Then proceed with following way:
(1). Use ‘Rectangle Select Tool’ To Make Selected Area Transparent :
If you want to use ‘Rectangle Select Tool’, you have to follow the steps in GIMP. 1.
Right click on Image in Gimp. 2.
A drop down menu will appear, Go to ‘Layer’ option. 3.
In ‘Layer’, go to ‘Transparency’ option. 4.
Then Select ‘Add Alpha Channel’.Let's see the instruction given in following figure.

5.
After that select ‘Rectangle Select Tool’ from ‘Tools’. 6.
Now, select area where you want to make selection transparent. 7.
And Press ‘Delete’ from Keyboard.
Now, let's proceed to second process.
(2). Use ‘Free Select Tool’ To Make Selected Area Transparent :
(Right Click) Image >> “Layer” >> “Transparency” >> “Add Alpha Channel”
1.
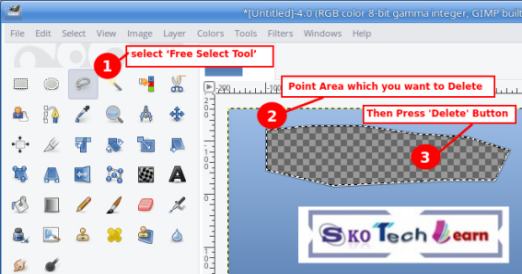
After this Process, you have to go to ‘Tools’ window and select ‘Free Select Tool’. 2.
Then point on area which you want to make transparent. 3.
And then join start and end point of ‘Free Select Tool’ then Press ‘Delete’ Button from Keyboard.This will make desire area transparent.
(3). Use ‘Eraser Tool’ To Make Selected Area Transparent :
Same way you have to select ‘Add Alpha Channel’ like first process.(Right Click) Image >> “Layer” >> “Transparency” >> “Add Alpha Channel”
1.
After that Select ‘Eraser Tool’. 2.
Then go to ‘Eraser Tool’ Properties and Increase or decrease Eraser ‘Size’ according to area selection. 3.
Then click on area of Image.This will make eraser area transparent.

Note: If you want to increase or decrease transparency level, you have to simply go to ‘Eraser’ tool’s Properties window and Increase or decrease ‘Opacity’ from 0 to 100%.
In Gimp, you will find many other tools that provide facility to transparent selected part in GIMP.
So, this way you can make Image Selected Area transparent in GIMP with SKOTechLearn easy tips.
 Permission Denied Error in VB6.0")


0 comments: