Static or Dynamic Way to Display Image in jFrame in Java Swing

In this post, SKOTechLearn describe the static and dynamic way to Display Image in jFrame in Java Swing with Netbeans through jLabel. Simply we can add image through Properties Settings or using Code which is described bellow.

Why we use jLabel for displaying image? Because, This is the simple way to handle any files like: jpeg, png etc using jLable pallet.

Open jFrame through Another jFrame in Java Swing

If you want to show external image or use it as internal way like add as logo or banner, then here we will describe as dynamic and static way. So lets learn with following two process:

 (1) Display Image in jLabel in Java Swing Static way 
 (2) Display Image in jLabel in Java Swing Dynamic way 

Come to the point by point description.

(1) Display Image in jLabel in Java Swing Static way :

In this process just create an image file or use your existing file and copy that file in your particular package. For this step by step process let's find following.

Suppose if you create a picture file and want to show. Then first copy that particular file and paste it on your project's package, or you can access through external path.
Drag_Image_File_In_Java_Package
Drag Image File In Package

Tips to Auto Resize Control Setting in Java Netbeans

As you can see, I simply copy my particular file and paste on my package. After that simply drag a jLabel from palette and adjust it's height width and location according to desire and after that follow the steps:


1.
Right click on jLabel.

2.
Select 'Properties' option or go to directly on 'Properties' window.

3.
Find “icon” option. And select your particular file.

4.
If it not show any file just click on 'Custom editor' buttonCustom_Editor_Buton_in_Java

5.
And select file from there.


For 'Custom editor' button, you can see that it will contain with icon's option of Properties windows. For easily understanding process follow the image.
Set_Icon_in_jLabel
jLabel icon setting

When you done all this process. It will display picture like shown in above figure.
So, this is the way of showing picture in static way.

How to Design or Change Look of jLabel in Java in Netbeans


(2) Display Image in jLabel in Java Swing Dynamic way:

If you want to show image in dynamic way, you have to write code for it, Suppose you want to show picture during jFrame's open or activate. So write code as we describe bellow.

But first, you have to import some class inside your java Package:
package simple_java; 

  import java.awt.image.BufferedImage;
  import java.io.IOException;
  import javax.imageio.ImageIO;
  import javax.swing.ImageIcon;

Now lets write show picture code on WindowsOpened evets:
private void formWindowOpened(java.awt.event.WindowEvent evt) { 
   try{
       BufferedImage image1 = ImageIO.read(getClass().getResource("skotechlearn.png"));
       jLabel1.setIcon(new ImageIcon(image1));
   }catch(IOException imgl){}

 }   

How to show external image in jLabel?

If you want to show picture from external url or path, then write code like:
String myimgpath; 
myimgpath= "your exteral file path";
Icon myimgicon = new ImageIcon(myimgpath);
jLabel1.setIcon(myimgicon);

When you run application then it will load picture during runtime and display it on jLabel.

Note:- You can also set jLabel as background image by setting the height width of jLabel according to jFrame.

So, this is the way of displaying image on jFrame in java Netbeans with static and dynamic process which is easily described in above given step by step process in SKOTechlearn post.

Simple Tips to Creating Swing GUI Application in Java

For further learning of coding, programming  or simple tips and trick related to OS, follow SKOTechlearn and learn things as simple as possible.

Tips to Use of jList for Showing Data in Java Swing

Change jTable Column Header and Rows Color in Java NetBeans Easily

In this post, SKOTechLearn will explain how to Change Color of jTable in Java like Column Header Color, grid Color, Rows Color, Selection Color. When I was started programming in java and using jTable, I faced problem of jTable background color foreground color of particular cells or rows and columns.

So here are the simple and easy tips to Change jTable Column Header and Rows Color in Java Netbeans Easily.

Easily Add Column Header in jTable with Grid Settings in Java

So here SKOTechLearn will described, how to Change jTable Column Header and Rows Color in Java NetBeans in simple way?
jTable background and foreground color in Java

So, Let’s take a look of Following Color changing point.

  1. jTable Column Header Background Color and Foreground or Font Color 
  2. jTable Column Header Background Color and Foreground Color in NetBeans
  3. jTable Rows Background and Foreground Color
  4. Change Background and Foreground Color of Particular Column's Rows in jTable
  5. jTable Selection background and Foreground Color
  6. jTable Selection Background and Foreground Setting in NetBeans

First you have to import Color Class:
 import java.awt.Color;

Now, Let's Proceed with above given point.


 (1). jTable Column Header Background Color and Foreground or Font Color :

There are many ways to change Header’s back color. You can change it through predefined system color or you can use custom color.

Column Header background with default system Color:
 MyTblView.getTableHeader().setBackground(Color.MAGENTA);

Column Header background with Custom Color :
 MyTblView.getTableHeader().setBackground(Color.decode("#696B9E"));

Or you can use JTableHeader class.

Enable or Show jTable Sorting Option in Java

First import this class:
 import javax.swing.table.JTableHeader;

Then use this class with following way:
 JTableHeader TblHeader = MyTblView.getTableHeader();
 TblHeader.setBackground(Color.GREEN);
Same above code process will apply here; we can set Foreground color with system default and custom color setting.

Column Header Foreground with default system Color :
 MyTblView.getTableHeader().setForeground(Color.BLUE);

Column Header Foreground with Custom Color :
 MyTblView.getTableHeader().setForeground(Color.decode("#FCE7FC"));

JTableHeader class for Foreground color code:
JTableHeader TblHeader = MyTbleView.getTableHeader();
 TblHeader.setForeground(Color.RED);

When you run any code the output will show in following way:
jTable_ColumnHeader_Background_and_Foreground_Color_Java


 (2). jTable Column Header Background Color and Foreground Color in NetBeans :

If you are using NetBeans for swing GUI project using jTable, the column header color will apply in different coding way. You have to use DefaultTableCellRenderer class in NetBeans Code.

DefaultTableCellRenderer MyHeaderRender = new DefaultTableCellRenderer();
MyHeaderRender.setBackground(Color.decode("#696B9E"));
MyHeaderRender.setForeground(Color.decode("#FCE7FC"));

MyTblView.getTableHeader().getColumnModel().getColumn(0).setHeaderRenderer(MyHeaderRender);
MyTblView.getTableHeader().getColumnModel().getColumn(1).setHeaderRenderer(MyHeaderRender);
MyTblView.getTableHeader().getColumnModel().getColumn(2).setHeaderRenderer(MyHeaderRender); 

After that this will show given output:
Netbeans_jTable_Header_Color


 (3). jTable Rows Background and Foreground Color :

There is simple code for doing this. But remember one thing; it can change color of all rows. The simple and easy codes are as follows:
 MyTblView.setBackground(Color.LIGHT_GRAY);
 MyTblView.setForeground(Color.BLUE);
This code will not be use for particular rows settings.

This will show the following output.
jTable_Rows_Background_and_ForeGround_Color


 (4). Change Background and Foreground Color of Particular Column's Rows in jTable :

Now, this is the very interesting point, because I have searched this point in many web-page and not find any suitable way to do this.

But, SKOTechLearn will explain simple tips to change Particular Column color of jTable in Java it, write or copy given code and see what happen.

First you have to import DefaultTableCellRenderer class:
import javax.swing.table.DefaultTableCellRenderer;

After that write given code:
 DefaultTableCellRenderer MyCellrendar = new DefaultTableCellRenderer();
 
 MyCellrendar.setBackground(Color.yellow);
 MyCellrendar.setForeground(Color.RED);

 MyTblView.getColumnModel().getColumn(1).setCellRenderer(MyCellrendar);

The output will be display like:
jTable_Particuluar_Column_and_cell_color_java
In getColumn() method, you can put any column number inside it and this will apply on that particular column's rows.

 (5). jTable Selection background and Foreground Color :

In java, there is facility to change selection color of particular rows in jtable according to requirement.

You can apply one line code as described below:
 MyTblView.setSelectionBackground(Color.BLACK);
 MyTblView.setSelectionForeground(Color.YELLOW);

jTable_Selection_Background_Foreground_Color


 (6). jTable Selection Background and Foreground Setting in NetBeans :

If you are using NetBeans, then you can simply go to “Properties” window and find “selectionBackground” and “selectionForeground” option and choose color according to your requirement.

Steps are described in given following image:
jTable_Selection_Color_Setting_Netbeans

So, these are the color changing process which is explained in Change jTable Column Header and Rows Color in Java NetBeans Easily.

Add Column Header in JTable and Grid Line Settings in jTable in Java

When you design you java project and want to show list of data in rows and columns format, you require a table or list, but List only contain one column with multiple rows and table contains multiple columns with multiple rows. You can find complete details of jTable class.

So Friends, here SKOTechLearn will discuss about jTable in Java with details description of Add Column Header in JTable in Java with jTable Grid setting in java NetBeans.

Change jTable's Column Header, Rows, Cell, Selection Color With Simple Steps

Suppose, you want to display some records which contains some Column. Then we have to drag jTable or write code for Adding Column Header in Java with Grid Settigns.


Here we proceed with following way:

  1. Add Column Header in jTable in Java Code
  2. Add Column Header in jTable in Netbeans through Properties
  3. jTable Grid Line Setting in java code
  4. jTable Grid line Setting in java Netbeans through Properties

So, let’s start with point to point.


(1). Add Column Header in jTable in Java Code :

For Column Header in JTable, you have to import some class as describe bellow:
 import javax.swing.JFrame;
 import javax.swing.JScrollPane;
 import javax.swing.JTable;
 import javax.swing.table.DefaultTableModel;

After that simply write following code:
 import javax.swing.JFrame;
 import javax.swing.JScrollPane;
 import javax.swing.JTable;
 import javax.swing.table.DefaultTableModel;

 public class MyTableClass {

   public static void main(String[] args) {
    // TableModel is use for showing rows and columns
    DefaultTableModel MyTablemodel = new DefaultTableModel();
    //Create New Table
    JTable MyTableView = new JTable(MyTablemodel);
    // Add jTable in jScollPane for Showing Column Header
    JScrollPane MyScrollPane= new JScrollPane(MyTableView);
    //Add Column Name 
    MyTablemodel.addColumn("MyColHead_ID");
    MyTablemodel.addColumn("MyColHead_Name");
    MyTablemodel.addColumn("MyColHead_Contact");
    //Add jFrame for showing Table inside frame
    JFrame MyTblFrame = new JFrame();
    MyTblFrame.setTitle("jTable Column Header Frame");
    //Set jFrame Size
    MyTblFrame.setSize(410, 320);
    MyTblFrame.add(MyScrollPane);
    MyTblFrame.setVisible(true);
   }
    
 }

Note : If you want to add rows and columns, DefaultTableModel will provide facility to do this.

When you execute this code this will show the following result:
jTable Column Header in Java


 (2). Add Column Header in jTable in NetBeans through Properties :

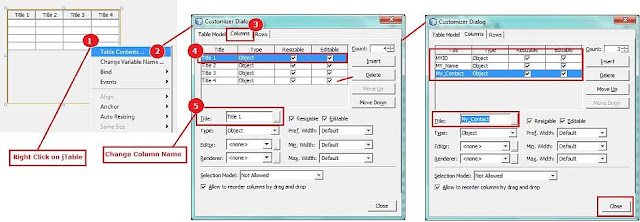
If you are using NetBeans for Java, First drag jTable in jFrame after that simply follow the following steps.

1.
 Right Click on jTable control and find “Table Contents…” option.

2.
 Click on “Table Contents…” option. “Customizer Dialog” will be displayed.

3.
 “Customizer Dialog” contains three tabs (Table Model, Columns, Rows ).

4.
 For headers, you have to choose “Columns” tab.

5.
 In “Columns” tab, you will find a table containing “Title, type, Resizable, Editable”. This is use for Column header settings.

6.
 Choose “Columns” tab which is also contain some buttons(Insert, Delete, Move Up, Move Down).

7.
 ‘Insert’ button is used to add Columns, ‘Delete’ is used for delete Columns, ‘Move Up’ and ‘Move Down’ button is used for move column left or right in jTable according to your requirement.

8.
 Select ‘Title’ Column from table and go to “Title” box and write your column Name.

9.
 After that simply close “Customizer Dialog”.

jTable Column Header Settings in Netbeans
Column Header Settings in NetBeans

When all settings will be done, your table will looks like bellow.
jTable Column Header Setting output in Netbeans


 (3). jTable Grid Line Setting in java code :

If you want to change Grid Line color of jTable, first you have to add some rows and then you can write following code which is very simple and one line code.

Grid Color Setting Code:
 MyTableView.setGridColor(Color.red);

Now check it with following code:
public static void main(String[] args) {
    DefaultTableModel MyTablemodel = new DefaultTableModel();
    JTable MyTableView = new JTable(MyTablemodel);
   
    //jTable grid Line Settings
    MyTableView.setGridColor(Color.red);
    
    JScrollPane MyScrollPane= new JScrollPane(MyTableView);
    MyTablemodel.addColumn("MyColHead_ID");
    MyTablemodel.addColumn("MyColHead_Name");
    MyTablemodel.addColumn("MyColHead_Contact");
    // add some rows
    MyTablemodel.addRow(new Object[]{"Col1Row1_0000", "Col2Row1_ABCD", "Col3Row1_XXX0124556"});
    MyTablemodel.addRow(new Object[]{"Col1Row1_0001", "Col2Row1_EFGH", "Col3Row1_XXX01253344"});
    
    JFrame MyTblFrame = new JFrame();
    MyTblFrame.setTitle("jTable Column Header Frame");
    
    MyTblFrame.setSize(410, 250);
    MyTblFrame.add(MyScrollPane);
    MyTblFrame.setVisible(true);
  }

This will display output in given following figure:
jTable Gird Color Change in Java


 (4). jTable Grid Line Setting in java Netbeans through Properties :

If you are using NetBeans for creating Swing project, you will find that jTable has no GridLines. First you have to add Gridlines then you can change Grid color according to your requirement.
 MyTableView.setShowGrid(true);
 MyTableView.setGridColor(Color.MAGENTA);

Or you can simple choose Grid Color from “Properties” window like bellow:
jTable Grid Color Properties in Netbeans

So, In this post you can see, how amazing is to work in java and NetBeans framework. You can simply Add Column Header in JTable and Grid Line Setting in jTable in Java which is detailed explained by SKOTechLearn.

Best Way of JTable Sorting in Java Netbeans with Details

jTable basically used for displaying information in the form of rows and columns. In Java you can easily design your table according to your need, so In this post we learn the Best way of jTable Sorting in Java NetBeans.

Easy Way to Add Coulmn Header and Change Grid Line Color of jTable in Java

Here, SKOTechLearn will explain row sorting of jTable with following way.

  1. Static way to Enable Row Sorting of jTable in Java
  2. Sort Particular Column of jTable in Java dynamically
  3. Disable Particular Column for Sorting of jTable in Java dynamically

Suppose we add some records in table. Now we have to proceed with above given point.


 (1). Static way to Enable Row Sorting of jTable in Java :

If you want to enable row sorting during design time. And sort it during run time then it can be done by two ways:

Enable Row Sorting through Properties in NetBeans

In NetBeans, you can just go to jTable’s "Properties" window, and find “autoCreateRowSorter” option from it.

Now, you have to check this option for enabling sorting like bellow.
AutoCreateRowSorter Setting in JTable in Netbeans
autoCreateRowSorter Setting
When you will check mark on “autoCreateRowSorter” and run application, you have to double click on any Column Header, the column will be sorted according to row’s value in ascending or descending way.
jTable Column Sorting in Java
jTable Column Sorting

Enable Row Sorting through code in Java NetBeans

if you want to set RowSorter through code then you can simply add this  "MyTableView.setAutoCreateRowSorter(true);" code in following way.
 public TableSortFrame() {     
   initComponents();
   //Here MyTableView is jTable   
   MyTableView.setAutoCreateRowSorter(true);
 }

So, this way you can easily create jTable with row sort setting in design time.


 (2). Sort Particular Column of jTable in Java dynamically :

Suppose, you make a project or application where you need to sort only specific column, then you have to follow with further steps.

Suppose, we want to sort Column No. 2 as describe above given table’s data. Now we sort “MyCol2” at runtime.

But first we have to import some classes:
 import javax.swing.table.TableModel;
 import java.util.ArrayList;
 import java.util.List;
 import javax.swing.table.TableRowSorter;
 import javax.swing.RowSorter;
 import javax.swing.SortOrder;

After that, we will drag jButton and write code for it like bellow:
 private void ColSortBtnActionPerformed(java.awt.event.ActionEvent evt) {  
   // MyTableView is jTable        
   TableRowSorter<TableModel> ColSort = new TableRowSorter<>(MyTableView.getModel());
   MyTableView.setRowSorter(ColSort);
   List<RowSorter.SortKey> ColSortingKeys = new ArrayList<>();
   //"SortColNo" is use to set Column No for Sorting
   int SortColNo = 1;
   //"SortKey" is used for sort order for a particular column
   ColSortingKeys.add(new RowSorter.SortKey(SortColNo, SortOrder.ASCENDING));
 
   ColSort.setSortKeys(ColSortingKeys);
   ColSort.sort();
  }       

In above code, We have changed jTable’s Name with “MyTableView”.

When you run jFrame. And click on “ColSortBtn”. This will show the following output:
jTable particular Column Sorting in Java
Friend, in above given way, you can easily sort any specific or particular column of jTable in Java at run time.

 Note: If you Double Click on any other column, then the sorting will also be apply on that column.


 (3). Disable Particular Column for Sorting of jTable in Java dynamically :

As you can see, the above given sorting process will be apply on any other column at run time.

If, you want to fix that only particular column will be sort and other column will not be used as sorting process. Then you have to disable that particular column for sorting.

Disable Column Sorting of jTable in Java

Suppose, you want to apply sorting in Column No. 3, and Disable Sorting in Column 1 and Column 2 then you will simply write following code for this process:
 private void ColSortBtnActionPerformed(java.awt.event.ActionEvent evt) {  
    TableRowSorter<TableModel> ColSort = new TableRowSorter<>(MyTableView.getModel());
    MyTableView.setRowSorter(ColSort);
    List<RowSorter.SortKey> ColSortingKeys = new ArrayList<>();
    //"SortColNo" is use to set Column No for Sorting
    int SortColNo = 2;
    //"SortKey" is used for sort order for a particular column
    ColSortingKeys.add(new RowSorter.SortKey(SortColNo, SortOrder.ASCENDING));
 
    ColSort.setSortKeys(ColSortingKeys);
    ColSort.sort();
    //Disable sorting in column 0 and column 1
    ColSort.setSortable(0, false);
    ColSort.setSortable(1, false);
 }
When you run it, this will work like following image.
Disable Column Sorting in jTable in Java
So Friends, you can try it yourself and find that what will happen. Simply create project in Java and write code for jTable Row sorting in Java Netbeans using SKOTechLearn Tips.

SQL Server Database Connection String in Java NetBeans with Query

In java, when you want to connect MS SQL Server Database and want to show Table’s record in java, then you have to remember one thing, you have to require suitable database driver for java.

So, Here SKOTechLearn will describe the process steps by step for SQL Server Database Connection String in Java with Query.

Connect Database And Access All Tables and Records with NetBeans

For This process you have to follow the steps given following.

  1. Download “sqljdbc4.jar” file 
  2. Attach “sqljdbc4.jar” File in Project’s Package
  3. Import SQL Class and Other Related Class 
  4. SQL Server Connection Code in Java with Example
  5. Use SQL Server Query in Java NetBeans


 Step(1). Download “sqljdbc4.jar” file :

If you want to use database connection on your projects, you have to know that you have to required suitable driver for database connection in java.

So, For SQL Server Connection in Java, you can use “sqljdbc4.jar” file for driver.

You can find it from many sites, and here are two sites where you can find this driver easily.

First Site
Second Site

 Step(2). Attach “sqljdbc4.jar” File in Project’s Package :

After that you have to create your project and when you expand your project in NetBeans, you will find there are many Package Folders available.

 1.
 Find “Libraries” Package Folder from you project.

 2.
 Right click on “Libraries” Package Folder. And Select third option “Add JAR/Folder…”.

 3.
 This option will show you “Add JAR/Folder” Window.

 4.
 Browse your downloaded “sqljdbc4.jar” file.

Add sqljdbc4 jar file in Java Project's Libraries
This jar file will be added on your project’s “Libraries” like above given image.

How to Set Default Main Class in Java Using Netbeans

 Step(3). Import SQL Class and Other Related Class :

Now, before start connection string, you have to import some class as described below.
 //java.sql.Connection is use for establishing connection from database
 import java.sql.Connection;
 //java.sql.DriverManager is used for calling driver with connection string
 import java.sql.DriverManager;
 //javax.swing.JOptionPane for Display Message
 import javax.swing.JOptionPane;


 Step(4). SQL Server Connection Code in Java with Example :

Now let’s try to connect database from server in java Netbeans, We will write code inside jButton’s ActionPerformed event.
 private void SQLConn_BtnActionPerformed(java.awt.event.ActionEvent evt) {    
  try {
     Class.forName("com.microsoft.sqlserver.jdbc.SQLServerDriver");
     Connection SQlCnn = DriverManager.getConnection("jdbc:sqlserver://XXX.XXX.X.XX; databaseName= MySQLDB; user= MYSQLUser; password= MySQLPasswrd");
     JOptionPane.showMessageDialog(null, "SQL Server Connection Successfully.");
     SQlCnn.close();
  }catch (Exception CnnErr){
     JOptionPane.showMessageDialog(null, "SQL Server Connection Problem");
  }
 }

When you run this code, the following output will be shown:
SQL Server Connection String Output in Java
Simply copy above code and modify servername, databasename, username and password then run your project.

Simple Way to Display Image in Java


 Step(5). Use SQL Server Query in Java NetBeans :

Suppose we have a table “MySQLDBTable” and there is two column “MyTBL_ID” and “MyUsrName”. And this table contains some records like bellow:

Database Table's Record in Netbeans
So, if you want to display all records, you have to use “Select Query Statement”. And write code in NetBeans in following way.

Use of  Select Query in Java 


private void SQLQuery_BtnActionPerformed(java.awt.event.ActionEvent evt) {
  try {
     Class.forName("com.microsoft.sqlserver.jdbc.SQLServerDriver");
     Connection SQlCnn = DriverManager.getConnection("jdbc:sqlserver://XXX.XXX.X.XX; databaseName= MySQLDB; user= MYSQLUser; password= MySQLPasswrd");
     Statement MyDBstmt = SQlCnn.createStatement();
     ResultSet MyRSet = MyDBstmt.executeQuery("Select * From MySQLDBTable");
     while( MyRSet.next()) {
          System.out.println(MyRSet.getString("MyTBL_ID") + "   |   " + MyRSet.getString("MyUsrName"));
        }    
     MyRSet.close();
     MyDBstmt.close();
     SQlCnn.close();
        
   }catch (Exception DBErr){
      JOptionPane.showMessageDialog(null, "SQL Server Connection Problem");
   }
 }   

When you run this code, this will show you following output.
Select Query Output in Java NetBeans
So, these are the steps for establishing connection from database server or SQL Server Database Connection String in Java Netbeans with Query.

What Settings for Auto Resize Control in Java Using Netbeans?

How to jRadioButton Select One Option at a Time in Java Netbeans

Whenever you use multiple jRadioButton in java, you have to face problem that it can not work as jRadioButton select one option at a time in java when you click on that particular option.

When you select one option and then jump or select other option, then previous option also selected including current selected option. So, get rid of this problem, you have to try or use following two ways described in SKOTechLearn Tips.

  1. jRadioButton Select One Option in Java through ‘ItemStateChanged’ events 
  2. Use ButtonGroup for Select One Option at a Time in Java

So, before we start, We have to drag this control , then change its Name and Text according to your self.

 (1). jRadioButton Select One Option in java through ‘ItemStateChanged’ Events

Suppose we drag 3 jRadioButton with name MyOption1, MyOption2, MyOption3. So, we have to write code inside every RadioButton’s ‘ItemStateChanged’ events.

jRadioButton ‘ItemStateChanged’ events

If MyOption1 is selected then write following code:
 private void MyOption1ItemStateChanged(java.awt.event.ItemEvent evt) { 
        if (MyOption1.isSelected()){
            MyOption2.setSelected(false);
            MyOption3.setSelected(false);
        }
    }

If MyOption2 is selected then write following code:
 private void MyOption2ItemStateChanged(java.awt.event.ItemEvent evt) { 
        if (MyOption2.isSelected()){
            MyOption1.setSelected(false);
            MyOption3.setSelected(false);
        }
    }

If MyOption3 is selected then write following code:
 private void MyOption3ItemStateChanged(java.awt.event.ItemEvent evt) { 
        if (MyOption3.isSelected()){
            MyOption1.setSelected(false);
            MyOption2.setSelected(false);
        }
    }
jRadioButton ItemStateChanged Event in java
ItemStateChanged Event

As you can see that when write this code and run application. And when you select any option, others will be deselected.

 SetSelected(true) : Is Use For Selection
 SetSelected(false) : Is Use For Deselecting


 2. Use ButtonGroup for Select One Option at a Time in Java:

Now, first we talk about ButtonGroup, Basically ButtonGroup class is use for selecting only one RadioButton and deselects remain RadioButton.

So, this can be done by adding all related jRadioButton in ButtonGroup.

Now, drag ButtonGroup on jFrame. Then write following code inside your jFrame class or ‘formWindowOpened’ events.

Import ButtonGroup class

First, you have to Import ButtonGroup class:
import javax.swing.ButtonGroup;

Add jRadioButton on ButtonGroup Class

If you want to initialize it in jFrame Class then write code like following way:
public MyRadioButtonFrame() {
        initComponents();
        ButtonGroup MyOptiongroup = new ButtonGroup();
        MyOptiongroup.add(MyOption1);
        MyOptiongroup.add(MyOption2);
        MyOptiongroup.add(MyOption3); 
  }

Or you can initialize it in jFrame’s ‘formWindowOpened’ events like bellow:
public formWindowOpened(java.awt.event.WindowEvent evt) {
        ButtonGroup MyOptiongroup = new ButtonGroup();
        MyOptiongroup.add(MyOption1);
        MyOptiongroup.add(MyOption2);
        MyOptiongroup.add(MyOption3); 
  }

jRadioButton Selected Option Example

If you want to display Selected Text from jRadiobutton on jLabel then go to following example.
private void MyOption1ItemStateChanged(java.awt.event.ItemEvent evt) {
        if(MyOption1.isSelected()){
            MyLabel1.setText("MyOption1 is Selected");
        }
    }

private void MyOption2ItemStateChanged(java.awt.event.ItemEvent evt) {
        if(MyOption2.isSelected()){
            MyLabel1.setText("MyOption2 is Selected");
        }
    }

private void MyOption3ItemStateChanged(java.awt.event.ItemEvent evt) {
        if(MyOption3.isSelected()){
            MyLabel1.setText("MyOption3 is Selected");
        }
    }
jRadioButton Option Select Example in Java
RadioButton Option Select Example

These two point will be use as jRadioButton Select one Option at a time in java Netbeans with SKOTechLearn Tips.

Use jTextField in Java NetBeans with Properties and easy example

If we talk about TextBox in Java, It is called as jTextField. When you want to input some text or value, you have to choose some Palette in Java. One of them is jTextField as Input Box. So, here SKOTechlearn describe about jTextFiled in Java Swing Netbeans with some basic properties settings and some easy example.

Java Swing Gui Project in Netbeans

So, what point we cover in this post according to jTextField palette which is described bellow:

  1. jTextField Properties Settings in Netbeans
  2. jTextField Properties setting through code
  3. jTextFileld with Get and set Value Example

So, Lets start, First drag this control on jFrame , then proceed with above steps.


 1. jTextField Properties Settings in Netbeans

Here we change some basic properties, which is necessary to provide attractive look according to application requirement.
Properties
Details
editable
This property is used for lock or unlock TextField
background
You can choose Backcolor
foreground
You can choose text color
Font
Change Font with Font Name, Font Style and Font Size
horizontalAlignment
Set Text alignment (LEFT, RIGHT, CENTER, LEADING, TRAILING)
SelectedTextColor
Set Border like (Bevel Border, Empty Border, Line Border etc)
Font
Change selected text Forecolor from this properties
SelectionColor
Change text selection back color

Now, understand it with following figure.
jTextField Properties Settings in java
Properties Settings in java Netbeans
So, this way you can easily change some basic properties of jTextField in java Netbeans.

2. jTextField Properties Setting Through Code

Now, you can apply above given properties settings through following code.

 Lock or Unlock JTextField:

The following code is for unlock or make editable TextBox.
private void TxtPropertyBtnActionPerformed(java.awt.event.ActionEvent evt) {    
     
   MyInputTxt.setEditable(true);

  }  

The following code is for lock or disable edit in TextBox.
private void TxtPropertyBtnActionPerformed(java.awt.event.ActionEvent evt) {    
     
   MyInputTxt.setEditable(false);

 }  


 Change Background Color of jTextField :

First Import color class for background and foreground color:
import java.awt.Color;

Then write following code.
private void TxtBackColorBtnActionPerformed(java.awt.event.ActionEvent evt) {   
   
   MyInputTxt.setBackground(Color.yellow);
      //or 
    // For Custom Color        
   MyInputTxt.setBackground(new Color(246,220,220));    
 
  }  


 Change JTextField Foreground Color:

private void TxtForeColorBtnActionPerformed(java.awt.event.ActionEvent evt) {   
   
   MyInputTxt.setForeground(Color.GREEN);
   //or 
   // For Custom Color        
   MyInputTxt.setForeground(new Color(146,220,120)); 
    
  }


 Change jTextField Font:

Fist Import Font class on your project like bellow.
import java.awt.Font;

Then write following code.
private void TxtFontBtnActionPerformed(java.awt.event.ActionEvent evt) {  

        Font myFont = new Font("Calibri", Font.BOLD, 20);
        MyInputTxt.setFont(myFont);  
 
 }


 jTextField Alignment :

Import following class.
import javax.swing.JTextField;

After that write following code.
private void TxtHAlignBtnActionPerformed(java.awt.event.ActionEvent evt) {   

     MyInputTxt.setHorizontalAlignment(JTextField.CENTER);

}


 Change jTextField Border Style:

First import border class.
import javax.swing.border.Border;

Then write following code:
private void TxtBorderBtnActionPerformed(java.awt.event.ActionEvent evt) {  
       
    Border myborder = BorderFactory.createEtchedBorder(0, Color.cyan, Color.yellow);
    MyInputTxt.setBorder(myborder);

 }


 jTextField Selected Text Color and Selection Color :

 // For Seleted Text Color
 MyInputTxt.setSelectedTextColor(Color.gray);
  // for Selection Color
 MyInputTxt.setSelectionColor(Color.ORANGE);


3. jTextFileld with Get and Set Text Example

In this process we consider about how to change value of jTextField or retrieve value from one TextField to another in java Swing NetBeans.

jLabel Design in Java Netbeans

So, the following code example will explain all these.

In Java For Input value we use setText(String) and for retrieve value or text we use getText().

 Code For Input or Set Text:

private void SetTxtBtnActionPerformed(java.awt.event.ActionEvent evt) {   
      
        MyInputTxt1.setText("SKO Tech Learn Tips");
        
  }

 Get text from one jTextField and set to another:

private void GetTxtBtnActionPerformed(java.awt.event.ActionEvent evt) {   
    String myStr;
    myStr = MyInputTxt1.getText();
    MyInputTxt2.setText(myStr);
  }
GetText and SetText in Java
GetText and SetText Code in Java

Auto Resize Palette or controls in java

So this is the some basic properties settings in jTextField and use of  jTextField in Java Netbeans.

Open othe jframe through button click in java