In Netbeans, there is facility to connect any type of database through server or locally. But there is point that, you have to use particular driver for it, same way you have to use driver for Connect SQL Server in NetBeans. Suppose, if you want to View database and related tables on your system, and want to implement or create database or tables in related SQL server, So, it provides the easy way of performing these kinds of things.
So, In this post we will learn, how to connect MS SQL server database in NetBeans with sqljdbc driver with SKOTechLearn Tips.
How To Use SQL Server Connection String in Java Code with Query?
First remember one thing; you need a driver for it. And this name is sqljdbc4.jar or maybe you find latest version of it. There is many downloading site available there, you can download from here.
What is the Use of Services Tab in Netbeans:
One main thing you have to understand that, in Netbeans, there is "Services" Tab which is use for database connection, web services etc. for more details of "Services" go Service Tab In Netbeans. Mainly we can use it for hosted or local database connection.Now come to the point, After downloading sqljdbc4.jar file. Follow the steps Bellow.
How to connect sqljdbc driver with Netbeans?
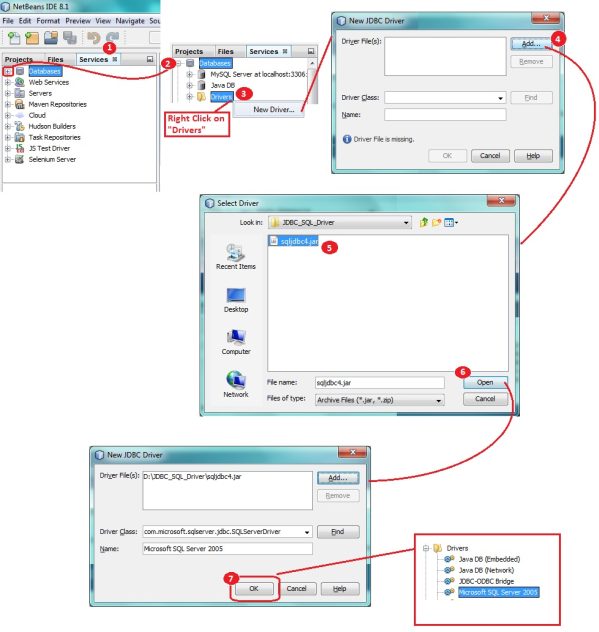
For it, just follow the step by step process as given follows:
1.
Open NetBeans IDE and you will find, there are three tabs with name “Projects”, “Files” and “Services”. Go to “Services” tab in Left side of screen.
2.
After that the “Services” tab containing the tree list like “Databases”, “Web Services”, “Servers” etc.
3.
Go to “Databases” Option. And Expand it through the plus sign . This will also show you sub tree list with options “Java DB”, “Drivers” etc.
4.
Right click on “Drivers” option and select “New Driver…” option from drop down menu.
5.
“New JDBC Driver” screen will show. Find “Add..” button and click on it.
6.
A “Select Driver” screen will appear. Just go to path where the sqljdbc is exists. And select it and Press “Open” button.
7.
After that press “OK” button from “New JDBC Driver” screen.Just figure out following image.
 |
| Driver process in Netbeans |
MS SQL Server Connect with Netbeans' Services.
How to connect SQL Server with Netbeans?
After completion of above process, now it’s time for database connectivity from server. So First you have to again go to “Services” tab and proceed in following process.
1.
Again go to “Databases” option from Tree list and right click on it.
2.
Right click and select “New Connection…” option.
3.
A “New Connection Wizard” window will appear.
4.
Here find “Driver” combo box and select your created connection here. Then press “Next” Button.
5.
This will proceed in “Customize Connection” screen. In this screen, we have to Input Connection String.Here fill up Connection String Field with following way.
| Host: | xxx.xxx.xx.xx |
| Port: | xxxx |
| Database: | SKOTechLearn (Whatever your database name) |
| Instance Name: | |
| User Name: | SA (or anything which you have defined) |
| Password: | *********** |
6.
Now, Press on “Test Connection” button. If Test Connection Success, then press on “Next” button.
7.
Next Screen will be for “Choose Database Schema”. Here, select schema like “dbo”.
8.
After that “Choose name for connection” screen will show, input your desire name and then click on “Finish” button. |
| SQL Server Connection Process |
As you can see the related database connection has been established with input connection name eg. “MYDB_SKOTechLearn”. Now when you expand it, it will show “SKOTechLearn” Database and inside this, there is table details you find there. Now you can easily create your table inside it.
So, Here SKOTechLearn Tips describe the way, where you can Connect SQL Server Database in Netbeans with Sqljdbc Driver.


Thanks for sharing this article. It's very valuable for me and everybody.
ReplyDeleteUr Welcome and Thanks for it...!!!!
Delete