How to Open Another Existing jFrame in Java NetBeans

Suppose, we have added two jFrame and want to open another jframe through existing jframe’s button’s click event. Suppose, First is ‘TestJFrame’ and second is ‘Second_Jframe’. Both contains same packages.

So the point is, we want to open it through button’s press and back to first through second jframe’s button press. So, SKOTechLearn will explain How to Open Other jFrame in Java NetBeans.
Add_two_jFrame_in_Java
Add jFrame

Now, Let's start step by step process how to open another existing jframe in java NetBeans.

How to use jLabel in java define step by step

First we Design ‘TestJFrame’ through adding some controls like jLabel and jButton. And add some code inside button’s "ActionPreformed" event.
Code_for_open_Existing_Jframe
Code for Open Existing Jframe

As you can see that we have described the code description in above given image. You can copy code from following.
 private void MyButton1ActionPerformed(java.awt.event.ActionEvent evt) { 
        Second_Jframe jfrm2= new Second_Jframe();
        jfrm2.setSize(270, 160); 
        jfrm2.setVisible(true);
        this.setVisible(false);
        this.setDefaultCloseOperation(this.EXIT_ON_CLOSE);
        this.dispose();
    } 

In ‘TestJFrame’, it is necessary to close window when the frame will be hide as:
 this.setDefaultCloseOperation(this.EXIT_ON_CLOSE);

After that when you press button to open another one, you have to dispose the existing form when another will opened.
 this.dispose();

How Auto Resize Controls work in Java and Process to Change Control's Name in Java?

You can set the size or leave it with existing default size as you designed. For size define set it like:
 jfrm2.setSize(270, 160); 

When you run application, it will show you the following way:
Jframe open output

Now if you want to back to your first frame, then you have to write code in button’s ‘ActionPerformed’ event as you write in first frame.

The code is same as:

private void MyButton1ActionPerformed(java.awt.event.ActionEvent evt) { 
        TestJFrame jfrm1= new TestJFrame();
        jfrm1.setSize(270, 160); 
        jfrm1.setVisible(true);
        this.setVisible(false);
        this.setDefaultCloseOperation(this.EXIT_ON_CLOSE);
        this.dispose();
    } 

The steps will be shown in bellow figure.
Open previous jframe process
Back to open Previous frame
Now follow the steps and copy this code and paste it in desire button’s event or any events from where you want to show.

How to set or display image in jframe in java

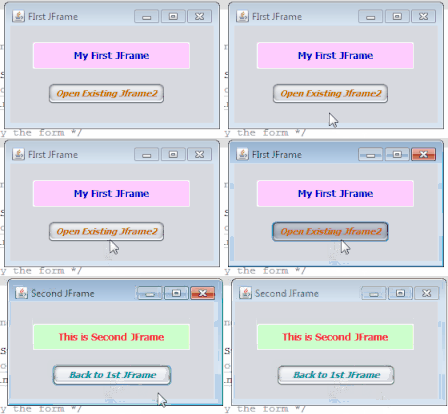
After doing all these process there will be the output present.
Open first and second jframe output
In this way you can show your static frame, which you have designed and want to show at run time with one click.


Open Dynamic JFrame:

First you have to understand, what is dynamic jFrame?

When you create jFrame at runtime through code, this will called dynamic jFrame.

For dynamic frame visibility, you can use the code as described beneath.

private void MyButton2ActionPerformed(java.awt.event.ActionEvent evt) {                                         
        JFrame Dynjfrm= new JFrame();
        Dynjfrm.setTitle("This is Dynamic jFrame");
        Dynjfrm.setLocation(400, 240);
        Dynjfrm.setSize(270, 160); 
        Dynjfrm.setVisible(true);
        this.setVisible(false);
        this.setDefaultCloseOperation(this.EXIT_ON_CLOSE);
        this.dispose();
  }   

In Dynamic process, you have to set the location, size etc through code as mention above.

Now you can understand how to Show Another jFrame in Java in dynamic or static way. I hope this post will helps you to implement the development process.

jRadioButton with Different Styles Options in Java Swing

SKOTechLearn explains everything with details and deep way for better understanding. So, the process of How to Open another existing jframe in java netbeans has been completed.

Types of MessageBox in Java NetBeans with jOptionPane

Auto Resize Controls in Java Swing and Change Controls Name in Java

Normally, if you design any application and want to provide facilities to Auto Resize Controls in Java Swing according to application screen with NetBeans' platform, you can easily set some settings on controls, that will ease to use for further process.

In this post we will also describe the process to change the name of any controls according to desire. So, here SKOTechLearn will describe the steps to how to auto resize controls in java and How to Change name of Swing Controls in Java, NetBeans.

Change background, foreground, font, alignment and border style of jLabel

Auto resizing Controls in Java Swing Using NetBeans:

First, we learn Auto resizing process of Controls.

Drag some controls from “Palette” window, whatever you want to add and select all controls or select one and right click on it. It will show you many option.

Find “Auto Resizing” option. In this option contains two sub options:

Horizontal
Vertical

You can select both or any one option. The following image show the complete process.
Auto_resize_Controls_process_Java
Auto Resize Setting
When you apply these steps and when you run application, the controls will automatic adjust with the calculation of jFrame height width and control’s height width.
Auto_resize_process_during_Runtime
Auto resize at run time


How to change Controls Name in Java:

If you are using NetBeans for application development, you can change name through two way.

  1. Change Swing Controls Name in Java through NetBeans Settings
  2. Change Swing Controls Name in Java through Code

So, we start from first way:

1. Change Swing Controls Name in Java through NetBeans Settings:
In Static way, if we want to change Swing Control's Name, just select any control and right click on it and find option “Change Variable Name…”.

Click on that option, it will show you small input dialog box with “Rename” name.

In this box, you will find the name of control. Now, change it whatever you want to change according to desire.

This Name will be used in Source code of Java for required process.

How to upload or show image in jLabel in java?

The following image will show the step by step process.

Change control name Process in java
Change Variable Name Process
Now come to second way:


2. Change Swing Controls Name in Java through Code:
In dynamic way we can create Swing Controls and Change Swing Control Name dynamically though code at run time, you can write code inside “WindowsOpened” event or initialize component in class.

But first you have to import some Libraries for Swing Controls in Java. Suppose, if you want to add some buttons and Labels, then import following libraries class as follows:

 import javax.swing.JButton;
 import java.awt.Label;

After that Write code like bellow:
 public TestJFrame() { 
        initComponents();
        
    JButton MYbtn = new JButton(); // create jButton with desire Name
    Label Mylbl = new Label();    // create jLabel with desire Name
       
    Mylbl.setLocation(20, 20);   //set the location of jLabel
    Mylbl.setBackground(Color.MAGENTA);
    Mylbl.setText("Dynamic Lable");
    Mylbl.setSize(100, 20);    // set the size of jLabel
    
    MYbtn.setLocation(20, 60); //set the location of jButton
    MYbtn.setSize(120, 25);   // set the size of jButton
    MYbtn.setText("Dynamic Button");
      
    MyPanel1.add(Mylbl);    //add jLabel on jPanel
    MyPanel1.add(MYbtn);    //add jButton on jPanel
        
    } 
After that when you run application, it will looks like bellow.
Dynamic add control with change name in java
Dynamic Control with Change Name
So friends, apply these steps and create whatever you want in java Netbeans. Now SKOTechLearn has explain how to Auto resize control in Java and change name of controls in java NetBeans.

There are following more Learning tips in Java:

Tips to Use Messagebox in Java Swing Step By Step Guide

Show All Tables In Netbeans IDE with SQL Server Database Connection

Stylish jRadioButton in Java Swing in Netbeans

Change Style And Design of jLabel In Java Swing With NetBeans

In java programming, jLabel play a different types of roll in programming an application. jLabel has capability to show images on your application. It can also show the different type of appearance style in java. There is no need to add any image viewer to show image. But in this post we learn how to change jLabel style and design of jLabel in Java Swing NetBeans?


We will proceed with following steps:
(1). Set jLabel Background Color
(2). Set jLabel Foreground Color and jLabel Font Settings
(3). Set jLabel Text Alignment
(4). Set jLabel Border Style

Now, lets start with step by step process.

How to set or display image in jFrame with jLabel in java?


(1). Set jLabel Background Color :

First of all you have to understand the property of any control in java NetBeans. Maximum setting will be done through mouse click on Properties window. You can add this window on any side or open it through right click of any control. So, First we Set background color of jLabel.

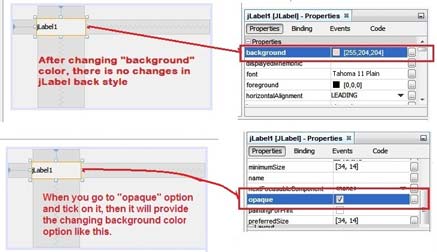
If you think that is simple to go to properties window and click on “background” option and choose any color to set back style. Then you are wrong, there will no changes on it like bellow image.

jLabel background color setting
Background Color Setting
As you can see that you have to setting on two option first “opaque” and then “background” option for color selection.

Process:

➤ Go to “opaque” option and tick mark on it.

➤ After that go to “background” option and choose desire color.

Or you can use code in application as like:

 MyLbl1.setOpaque(true);
 MyLbl1.setBackground(Color.cyan);  

Auto Resizing Controls in jFrame in Java Swing


(2). Set jLabel Foreground Color and jLabel Font Settings:

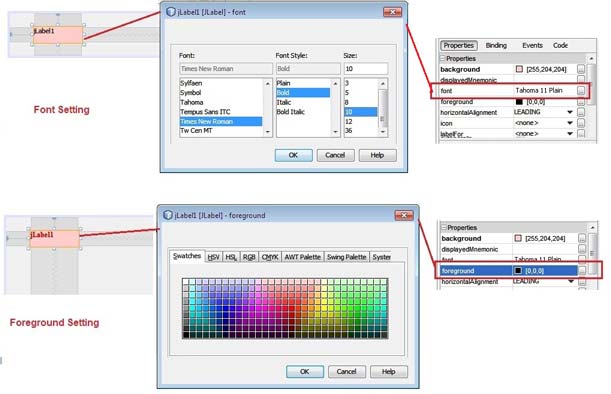
For font setting just go to “font” option of Properties window and choose font name, size and type. And in same way go to “foreground” option and choose font color whatever you want just describe and mention in bellow image.

jLabel Forecolor and Font setting
Foreground Color and Font Setting

If you want to set it through code, then you have to write bellow code in jframe's "initComponents" or "WindowsOpened" event just same as following:

Font fnt = new Font("Calibri",Font.BOLD,18);
MyLbl1.setFont(fnt);
MyLbl1.setForeground(Color.GREEN);

whatever color or font you choose from this settings for your application.


(3). Set jLabel Text Alignment:

You can set the alignment in two ways Horizontal and Vertical alignment. And both has following setting:
 jLabel Horizontal Alignment
 Trailing
 Right
 Left
 Leading
 Center

there is following code of horizontal alignment, you can use without properties setting.

 MyLbl1.setHorizontalAlignment(SwingConstants.CENTER);
 MyLbl1.setHorizontalAlignment(SwingConstants.RIGHT);
 MyLbl1.setHorizontalAlignment(SwingConstants.LEFT);

or

 MyLbl1.setHorizontalAlignment(0);  //center
 MyLbl1.setHorizontalAlignment(4);  // right
 MyLbl1.setHorizontalAlignment(2); // left


Open jFrame Though Another jFrame with Button's Click in Java Swing


 jLabel Vertical Alignment
 Bottom
 Top
 Center

You can use code for vertical alignment at run time.

 MyLbl1.setVerticalAlignment(SwingConstants.TOP);
 MyLbl1.setVerticalAlignment(SwingConstants.BOTTOM);
 MyLbl1.setVerticalAlignment(SwingConstants.CENTER);

or

 MyLbl1.setVerticalAlignment(1); //top 
 MyLbl1.setVerticalAlignment(0); //middle
 MyLbl1.setVerticalAlignment(3); //bottom

When you select any one of these options, the text will adjust according to alignment setting like bellow.
Horizontal Alignment setting
Horizontal Alignment Setting

Vertical Alignment setting in Netbeans
Vertical Alignment Setting
In this way we can set the alignment of text.


(4). Set jLabel Border style:

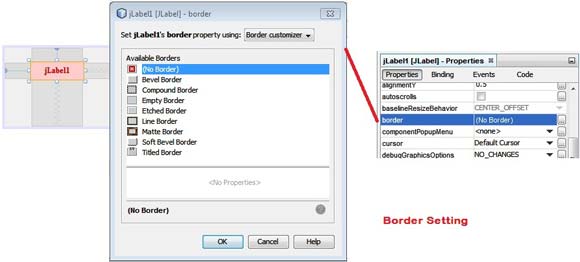
For border setting just apply the same process and select “border” option. In this option there is following border style option will show.
Border Setting in java Netbeans
Border Setting
You can see there are different types of border style option. You can choose anyone step by step and fix whatever is looking stylish for your desire.

Design Swing GUI Application with jFrame in Java Swing


If you want to change border style at run time, you have to write code as mention bellow. We define different type of border style in code:


  Border brdr = BorderFactory.createLineBorder(Color.RED);
  MyLbl1.setBorder(brdr); // for Line Border

  Border brdr1 = BorderFactory.createBevelBorder(1);
  MyLbl1.setBorder(brdr1); // for Bevel Border

  Border brdr2 = BorderFactory.createEtchedBorder(Color.red, Color.yellow);
  MyLbl1.setBorder(brdr2); // for Etched Border


In this way you can set background, foreground, font, alignment and border style of jLable in java. You can easily handle it with GUI base and Change Style and Design of jLabel in Java Swing with NetBeans with SKOTechLearn Tips.

Use of jRadioButton with Look and Style Setting in Java Swing